How to Set Up Your PhotoSphere
Your PhotoSphere is ready to use out of the box. Setup is easy. Follow these instructions:
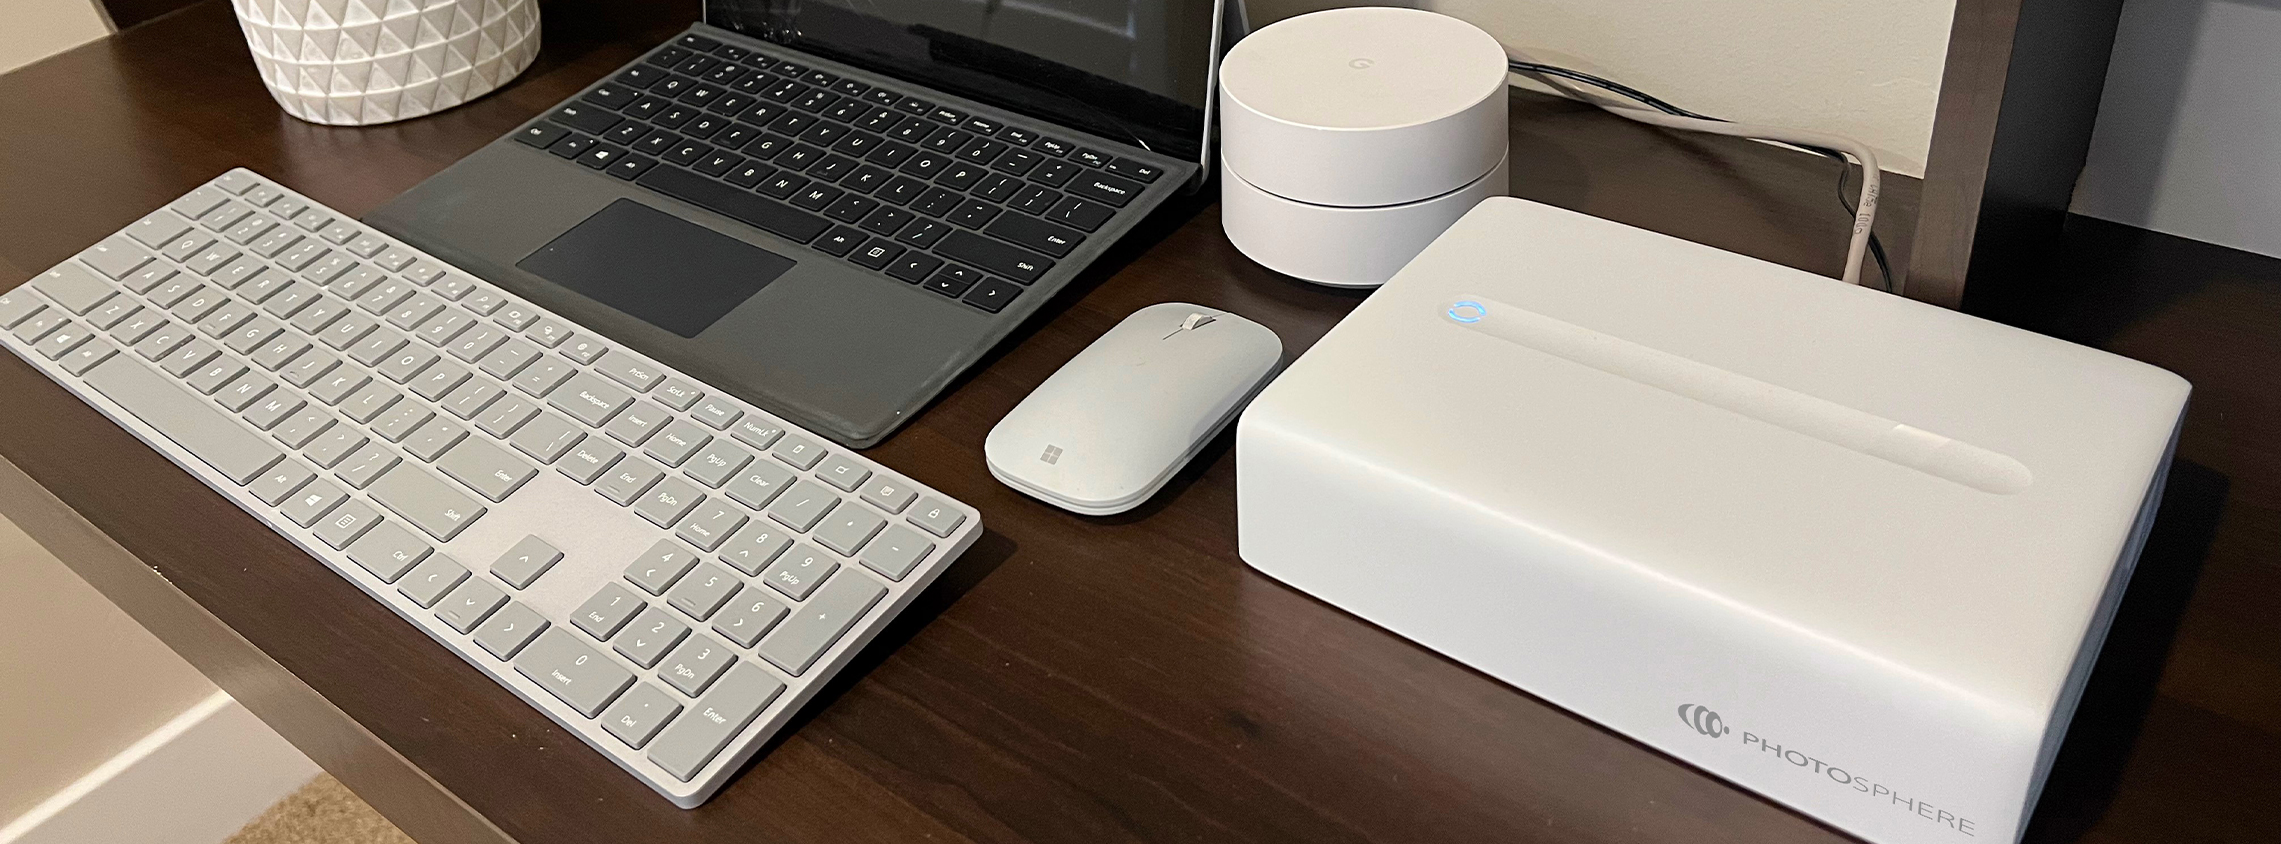
What’s In the Box:
- PhotoSphere
- Power Cable
- Network Cable
- User Guide
Step 1: Plug one end of the network cable into your PhotoSphere and the other end into your Wi-Fi Router, Wi-Fi Extender, or Router and the other end into your PhotoSphere’s network port.
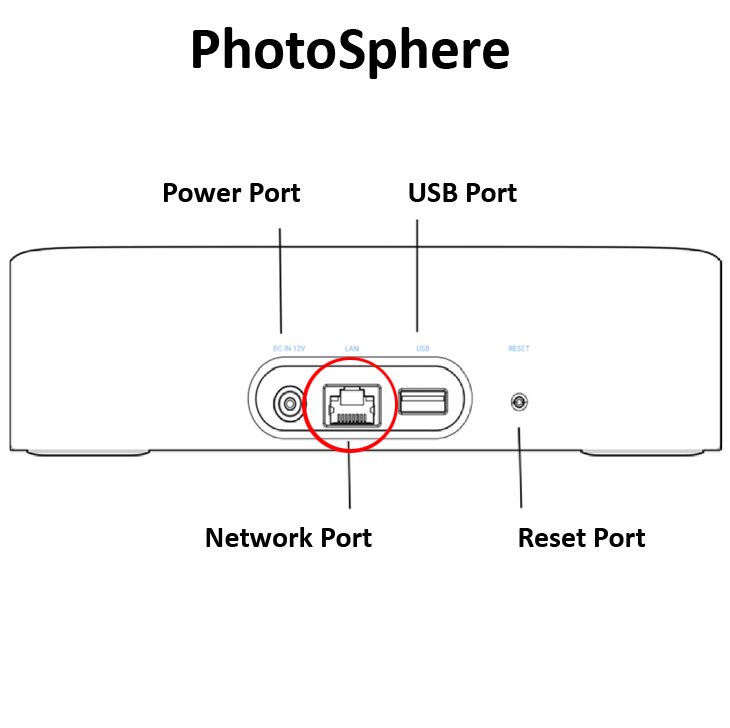
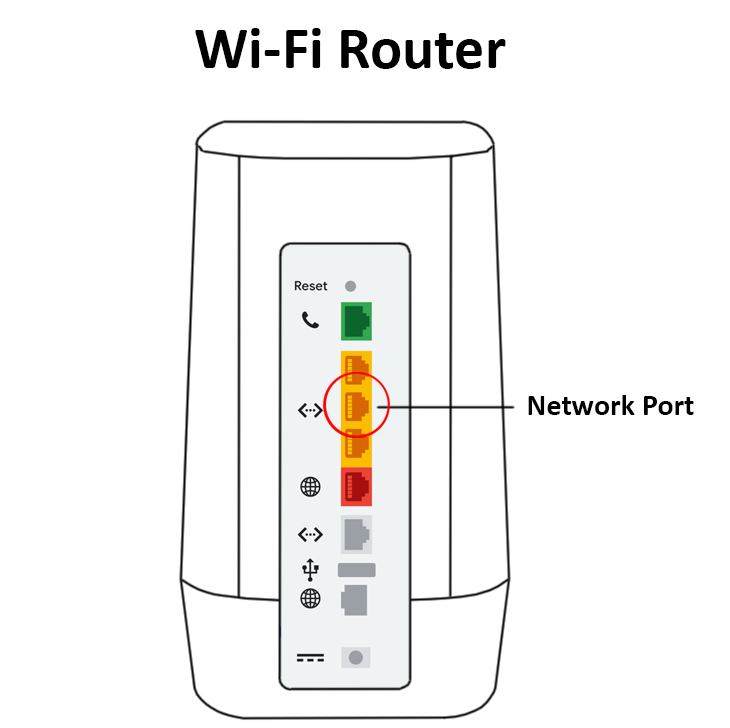
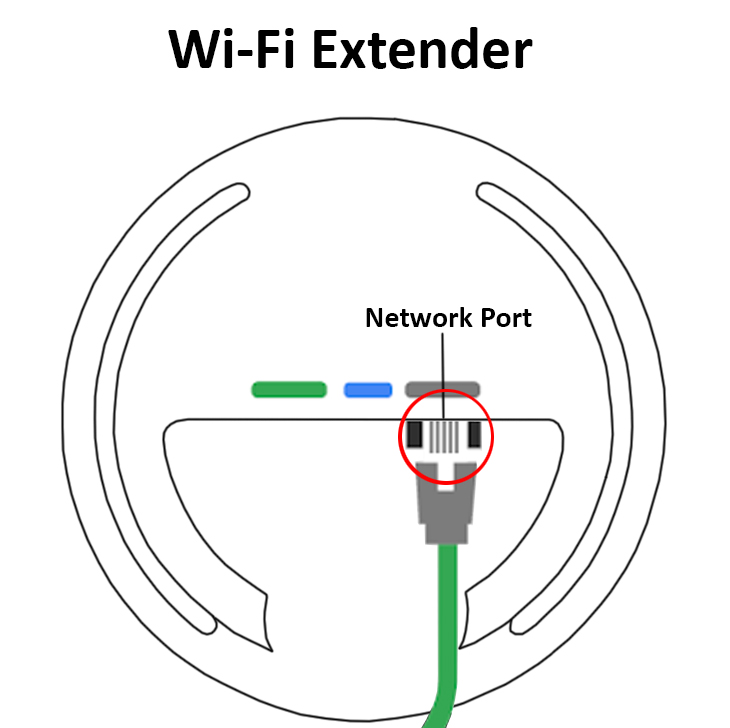
Note: Some Wi-Fi Extenders only have a network “in” port and not a network “out” port. If yours does not have a network “out” port, you will need to plug directly into your Wi-Fi router or a standard router.
Step 2: Plug your PhotoSphere into a power outlet.
Step 3: Install the Get PhotoSphere App from the Apple App Store or Google Play Store or scan the QR code below.
iOS App – For iPhones and iPads
Android App – For Android Phones or Tablets

Step 4: Make sure you are on the same network that your PhotoSphere is plugged into and open the app.
Step 5: Agree to all permissions so the app can work with your phone.
Step 6: Ener your email address to set up a Primary account on your PhotoSphere, agree to the Privacy Policy, and tap the button to get your verification code.

Step 7: Retrieve your verification code from your email and enter it into the PhotoSphere app.

Step 6: Tap the “+Add” button on the home screen to add a PhotoSphere device.
Step 7: After verifying you have everything connected, tap the “Start searching” button. If no device is automatically detected, tap “Try again”.
Note: Please allow a couple of minutes for your PhotoSphere to finish booting up. Even if the light is blinking amber, it may still not be fully booted.
Step 8: When your PhotoSphere is detected, tap “OK”.

Step 9: You will be prompted to “Choose Your Backup Settings”. Tap on the “Edit” button to choose automatic or manual backups.

Troubleshooting
If you receive a message that there is no storage or that your storage needs to be formatted, follow these instructions.
Step 10: Turn on “Photo and Video Backup” to start backing up your device. It is also recommended that you leave “Allows automatic backup…” turned on to back up all new photos and videos as they are taken.

Connecting Other Devices
You can connect other phones, computers, and tablets to your PhotoSphere for automatic backups. Adding other devices is as easy as logging in using the email address on your Primary account.
Please note: to add devices to your main PhotoSphere account, use the same email address you used to set up the Primary account. If you use a different email address, it will create a sub-account on your PhotoSphere and you will not have access to the backed up files from other devices.
Adding Phones & Tablets
Step 1: Install the Get PhotoSphere App from the Apple App Store or Google Play Store.
Click here for quick links to the apps in the app stores: https://cloud.getphotosphere.com
Step 2: Enter the email address used for your Primary account, agree to the terms, and tap the “Obtain Email Verification Code” button.
Step 3: Retrieve your verification code from your email and enter it into the PhotoSphere app.
That’s it. Now, you can choose your backup settings and access files from your other devices that have been backed up.
Adding Computers
Step 1: Install the Get PhotoSphere App for your computer from here: https://cloud.getphotosphere.com
Step 2: Open the computer app and it will display a QR code for you to scan using your phone.
Step 3: Open the app on your phone and tap the QR code icon in the upper-right corner.
Step 4: Scan the QR code and you will be logged into your PhotoSphere and you can set your backup preferences and access files from other devices.
Inviting Others to Create an Account on Your PhotoSphere
You can invite other people to create a sub-account on your PhotoSphere. This will allow them to connect all their devices to be backed up to your PhotoSphere while maintaining their privacy. They can add all their devices and you won’t be able to access their data, even when you map the PhotoSphere as a network drive on your computer.
You can choose to allow sub-account users to access external USB storage connected to your PhotoSphere. This is an easy way to share files/folders with sub-account users. If you grant them access, they can add and remove files from the external storage.
Adding Sub-Accounts
Step 1: Open the app on your phone and tap on the “My” button in the lower-right corner.
Step 2: Tap the “Guest Accounts” button and then the “Invite Guests” button.
Step 3: Type in their email address and tap the “OK” button.
Step 4: The new user will be emailed a link. You can also tap the “Copy Link” button and paste the link into a text message.
Step 5: The guest must download the app and log in using their email address.
Step 6: Next, they will be emailed their verification code, just like the primary account did during setup. Once entered, the guest will be logged in.
Sub-account users now have their own account and can add their own devices using the same steps as shown above for adding devices. Note: sub-account holders cannot invite others to join your PhotoSphere. However, they can create shared albums and send others links to download photos or files from their backups.
Mapping a Network Drive to Your Computer
Although the PhotoSphere apps for computers displays all the backups from all your devices, you will need to Map a network drive to the PhotoSphere storage in order to use the Tonfotos photo manager app that comes with your PhotoSphere. Mapping a drive also makes it easier for you to access any USB storage device you connected to your PhotoSphere. It also makes it easier to backup your backup. Once you map a Network drive, you can simply copy your Backup folder on your PhotoSphere to a drive on your computer for a redundant backup.
Mapping a Network Drive - Phone App Settings
Step 1: Open the Get PhotoSphere app on your phone.
Step 2: Under “Device Management”, swipe left to reveal more choices
Step 3: Tap “LAN Applications” and turn “Samba” on.
Step 4: When you turn on Samba, you will be taken to a new screen where you can set your password. Enter a unique password and tap “OK”.
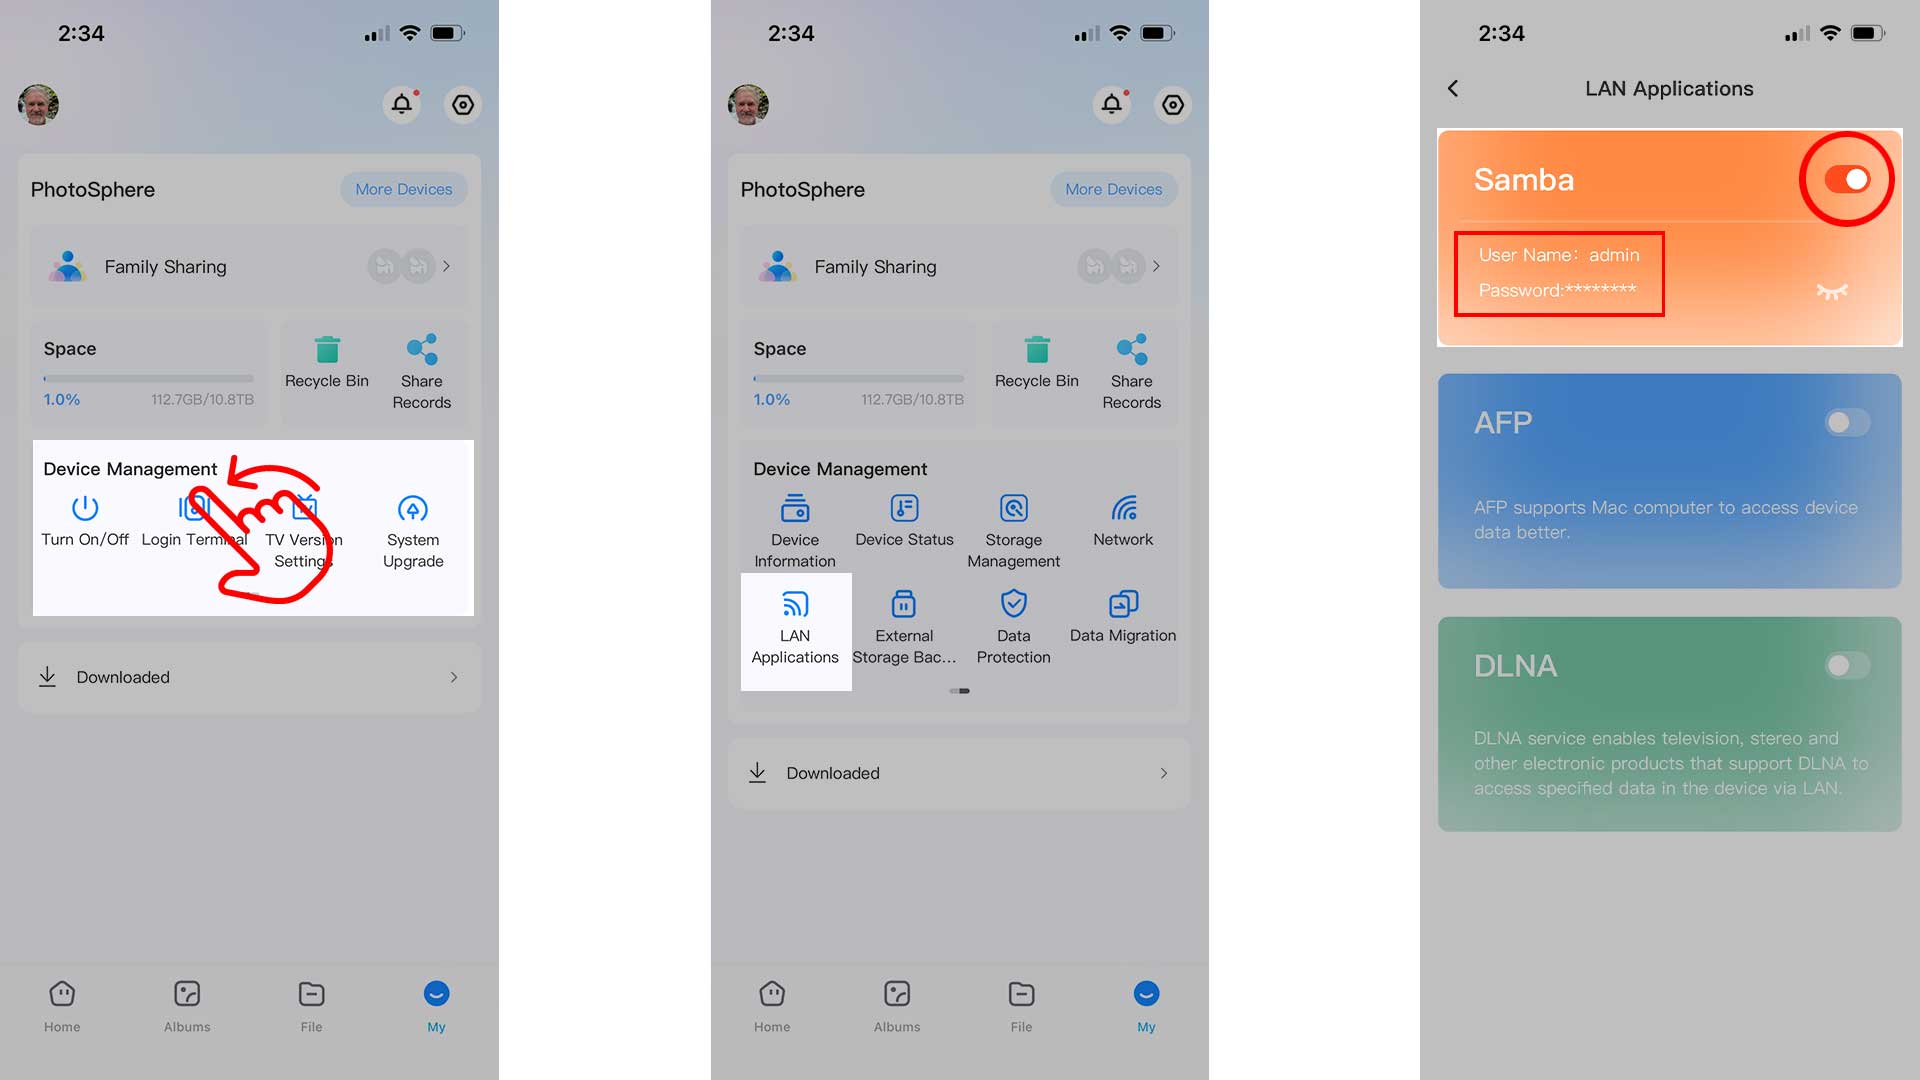
Note: Once Samba is turned on, you will not need to repeat these steps if you need reconnect your Network connection.
Mapping a Network Drive - Windows
Step 1: Leave the “Samba” screen open. It tells you the IP address of your PhotoSphere.
Step 2: On your computer, press the Windows key plus R (Win+R).
Step 3: In the window that pops up, type \\ and the IP address displayed in the phone app (i.e \\192.168.1.111)
Step 4: Enter the username and password as shown in the “Samba” screen on the phone app.
Step 5: You can now navigate to the storage on your PhotoSphere. Right click over the “admin_Home1” folder and select “Map Network Drive” and select a drive letter for the mapped drive.
Note: If your PhotoSphere loses power, your network will assign it a new IP address. You will need to repeat these steps to reconnect to your PhotoSphere.
Mapping a Network Drive - Mac
Step 1: Leave the “Samba” screen open. It tells you the IP address of your PhotoSphere.
Step 2: On your computer, go to Finder – Go – Connect to Server.
Step 3: In the window that pops up, type smb:// and the IP address displayed in the phone app (i.e smb://192.168.1.111)
Step 4: Enter the username and password as shown in the “Samba” screen on the phone app.
Note: If your PhotoSphere loses power, your network will assign it a new IP address. You will need to repeat these steps to reconnect to your PhotoSphere.