Tonfotos Guide
Tonfotos is an advanced photo management app for Windows and Mac computers that is included with every PhotoSphere. To receive your Tonfotos license, you must register your PhotoSphere and request a license.
Getting Started
Download and install Tonfotos. To register your product, follow these instructions:
- Open Tonfotos and go to File/Activate serial number…
- Enter your serial number and click “Continue”.

Map a Network Drive
Before you can add photos from your PhotoSphere into Tonfotos to be managed, you must first map a network drive to you PhotoSphere. If you have already mapped a network drive to your PhotoSphere, you can skip this step.
Note: Your computer must be on the same internet connection as your PhotoSphere to map a network drive.
Mapping a Network Drive to Your Computer
Although the PhotoSphere apps for computers displays all the backups from all your devices, you will need to Map a network drive to the PhotoSphere storage in order to use the Tonfotos photo manager app that comes with your PhotoSphere. Mapping a drive also makes it easier for you to access any USB storage device you connected to your PhotoSphere. It also makes it easier to backup your backup. Once you map a Network drive, you can simply copy your Backup folder on your PhotoSphere to a drive on your computer for a redundant backup.
Mapping a Network Drive - Phone App Settings
Step 1: Open the Get PhotoSphere app on your phone.
Step 2: Under “Device Management”, swipe left to reveal more choices
Step 3: Tap “LAN Applications” and turn “Samba” on.
Step 4: When you turn on Samba, you will be taken to a new screen where you can set your password. Enter a unique password and tap “OK”.
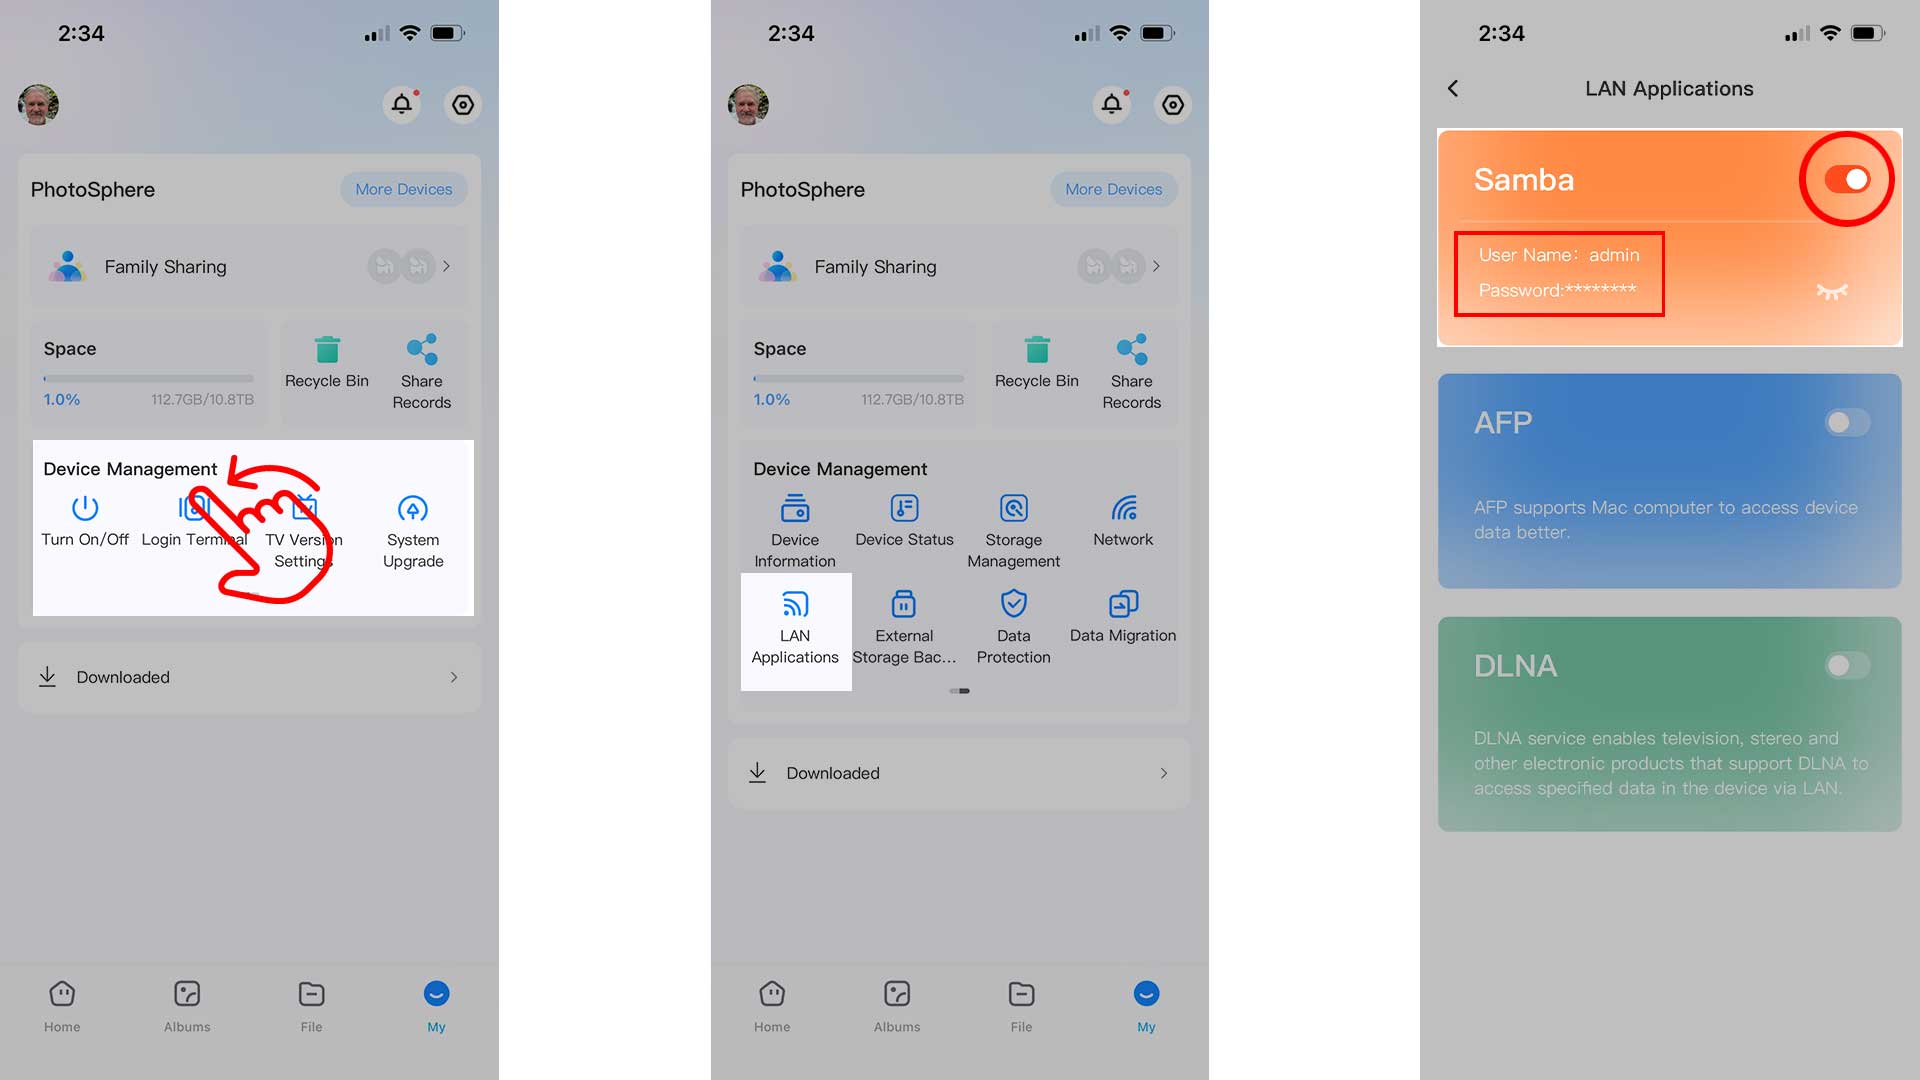
Note: Once Samba is turned on, you will not need to repeat these steps if you need reconnect your Network connection.
Mapping a Network Drive - Windows
Step 1: Leave the “Samba” screen open. It tells you the IP address of your PhotoSphere.
Step 2: On your computer, press the Windows key plus R (Win+R).
Step 3: In the window that pops up, type \\ and the IP address displayed in the phone app (i.e \\192.168.1.111)
Step 4: Enter the username and password as shown in the “Samba” screen on the phone app.
Step 5: You can now navigate to the storage on your PhotoSphere. Right click over the “admin_Home1” folder and select “Map Network Drive” and select a drive letter for the mapped drive.
Note: If your PhotoSphere loses power, your network will assign it a new IP address. You will need to repeat these steps to reconnect to your PhotoSphere.
Mapping a Network Drive - Mac
Step 1: Leave the “Samba” screen open. It tells you the IP address of your PhotoSphere.
Step 2: On your computer, go to Finder – Go – Connect to Server.
Step 3: In the window that pops up, type smb:// and the IP address displayed in the phone app (i.e smb://192.168.1.111)
Step 3: In the window that pops up, type smb:// and the IP address displayed in the phone app (i.e smb://192.168.1.111)
Step 4: Enter the username and password as shown in the “Samba” screen on the phone app.
Note: If your PhotoSphere loses power, your network will assign it a new IP address. You will need to repeat these steps to reconnect to your PhotoSphere.
Adding Your Photos
To add your photos from your PhotoSphere backups to Tonfotos, follow these instructions:
- Go to File/Library Locations…, or hit Alt+Shift+L
- Click the “Add location…” button and navigate to your PhotoSphere drive.
- Select the “Backup” folder and click “Select Folder”.

All of your backups will be displayed in the left column under “Photos”. You can expand the folders to view the photos by Folder, Events, Location, Albums, or People
Viewing Photos
Now that your photos are in Tonfotos, you have different options for viewing them. You can adjust the size of the thumbnail by sliding the image size bar near the top of the app.

Viewing by Folder
To view photos as they are stored on your PhotoSphere, select the “Folders” tab and use the tree-view on the left column to expand backup folders and sub-folders.
Note: Apple takes photos in .HEIC format which cannot be displayed on Windows computers. These will be shown with a broken image icon.
Viewing by Event
When Tonfotos initially scans your photos, it categorizes them by even based on the date the photos were taken. Click on the “Event” tab to view a timeline of all your photos in the left column. Select a date to view photos along with their detailed file information and geographic location when available.
Viewing by Location
Click on the “Location” tab to view a world map of where your photos were taken. Tonfotos uses the GPS coordinates from the metadata of your photos to pinpoint each location.
To view photos from any location, double-click on the icon of the photos displayed and your photos will be displayed in chronological order.
Note: When photos are opened from the “Location” tab, the “Event” tab view is displayed so you know the timeline. If multiple timeline events are from the same location, the timeline will update as you scroll through the photos.
Viewing by Albums
Tonfotos automatically applies smart Album filters to your photos based on things such as titles, location, and other keywords. Click on the “Albums” tab to view your photos in keyword albums.
Viewing by People
Viewing photos by people is the most advanced feature of Tonfotos. Using AI technology, your photos are scanned to sort them by person.
Adding People to Sort by Person
Tonfotos relies on you to tell it who is in photos. It only takes one time to tag someone for Tonfotos to learn their face and scan photos throughout all your backups. Follow these steps to tag people for facial recognition:
- Click on one of the tabs to view photos.
- Select a photo with a person you want to tag.
- In the right column, there is a “File information” section. It will display unknown faces with a ?. Right-click over the face you want to add and click “Enter person name…”.
- In the window that pops up, type the person’s name.
- Repeat this process for everyone you want to sort by person.

For a video tutorial on facial recognition using Tonfotos, click here.
Help it Learn
Sometimes, you’ll run across a photos with a tagged person in it but Tonfotos doesn’t recognize them. Anytime you see this, you can right-click over the face in the “File Information” card in the right column and tell it who it is.
Favorites
You can mark any photo as a favorite by clicking the heart icon in the upper-right corner of the app while viewing a photos. You can view the Fabourites album under the “Albums” tab near the top.
Search
Tonfotos has a powerful search feature. You can search by person, filename, folder, device, or album tag. To search, start typing your search term by clicking the search icon in the upper-right corner of the app.
Slideshow
You can play your photos as a slideshow on your computer. To play a slideshow, go to the folder, event, album, or people tab and select the first photo of the slideshow. This activates the “Play” icon in the upper-right corner of the app. Click on the icon to start your slideshow.
Tonfotos Support
If you are experiencing problems with your Tonfotos app, please contact us.